1.10 Tutorial: Arrows
EdumapsIntroduction
-
Arrows are available on sticker walls. They are positioned globally on the map.
-
✔️ With arrows you can:
-
- Visually connect text fields with each other (helpful for brainstorming)
- Mark sequences and process steps (workflows/flowcharts)
- Structure mind maps (branches with text fields)
- Define processes
- Create tree diagrams with text fields
- ✔️ Here you can find example maps with arrows and text fields.
1
Add Arrow
-
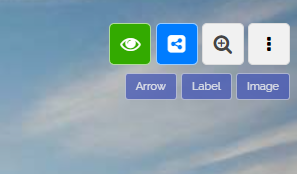
The map must be set to the “Sticker Wall” format. You will then find three blue buttons in the top right.
-
Then click on the blue button “Arrow”, and an arrow will be added to the map.
-
⚙ add
2
Options for Arrows
-
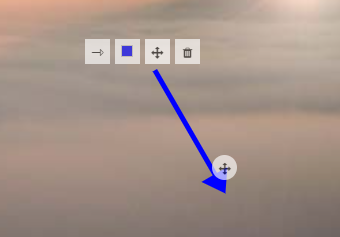
In the case of an arrow, the following editing options are available:
-
- Change the type of arrow (single, double, line)
- Change the color of the arrow
- Choose position (move the move icon or move the arrow itself)
- Delete arrow
- Change rotation (with icon at the arrowhead)
-
⚙ options
3
Guidelines for Positioning
-
Arrows should not be placed on elements of a background graphic because these graphics change according to the size of the screen. Resize the browser window to see how the background image scales automatically.
-
Arrows should always be directed only at boxes, columns, text fields, and other arrows, as these are absolutely.
-
⚙ guidelines
5
Precise movement of arrows
-
Positioning an arrow with the mouse can be imprecise. To position an arrow more precisely, select the arrow (or add a new one) and then use your keyboard.
-
Hold down the Shift key and use the cursor keys (
←↑→↓) to precisely position the arrow. -
Instead of Shift, hold Ctrl to move the arrow in smaller increments.
-
⚙ move