5.1 Booking System
Edumaps Tutorial EdumapsIntroduction
-
✔️ With the booking system, you can assign a bookable time slot to each box. This lets you quickly and easily create and organize courses.
-
You can also collect payments via PayPal.
-
The booking system can be used for:
-
- Courses and workshops
- Parent-teacher conferences
- Participation in sports events
- Meeting rooms
- Attendance at concerts
- Meal orders
-
✔️ The booking system is powerful and can save you a great deal of time.
1
Activate Bookings
-
You can easily convert a box into a course.
-
- The box title becomes the course title.
- The box content becomes the course content.
-
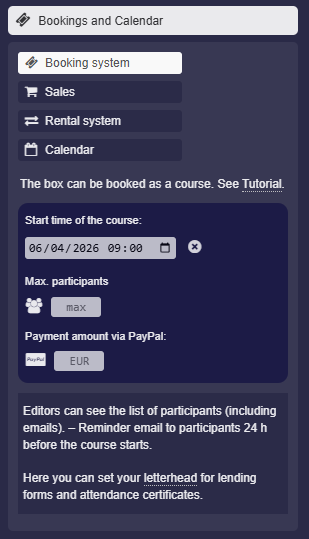
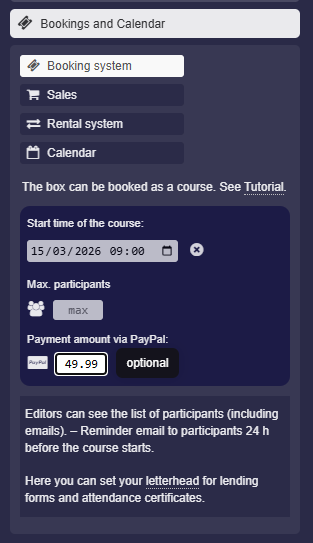
To do this, click “Calendar and Bookings” in the box settings. There, activate the “Booking system” option:
-
Then set the course start time in the input field.
-
- Optionally, you can enter the maximum number of participants.
- Optionally, you can set a price that participants can pay directly via PayPal.
- The Paypal feature is not available on all servers.
-
Click “Save Box” – Congratulations, your course is now activated.
-
Note: This option cannot be activated by students or anonymous users.
-
⚙ activate
2
Booking Process
-
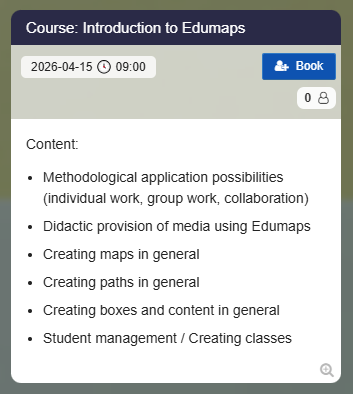
Once you have finished setting up your map and have enabled bookings for one or more boxes, you can distribute your map via a link.
-
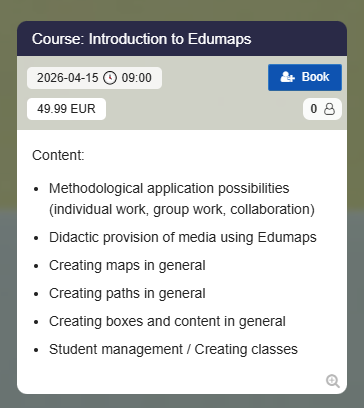
The users visiting your map will now see a booking button directly on the box:
-
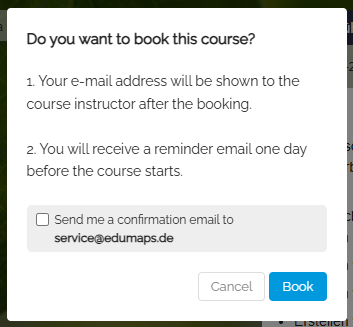
If the user clicks on the blue booking button, they will receive the following message:
-
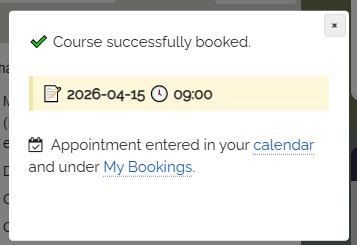
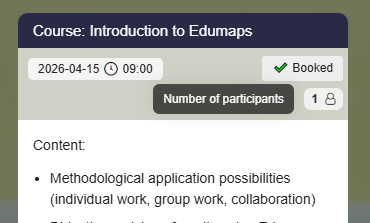
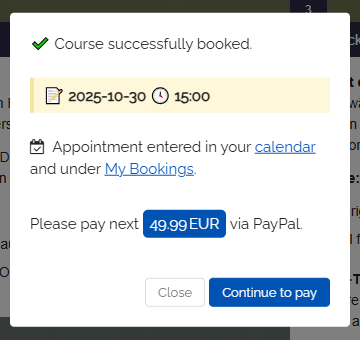
If the user confirms by clicking "Book", they will be successfully enrolled in the course.
- The appointment can now be found in the user calendar.
-
A "Booked" label appears on the box.
-
⚙ process
3
Who can book?
-
Booking is possible for users registered on Edumaps, but also for anonymous visitors.
-
If a user is logged in, they can click directly on the book button and will be enrolled in the course.
-
If an anonymous visitor clicks on the book button, two options will appear:
-
- log in with an account
- book directly with email
-
If the user then clicks on “Book directly with email”, they can enroll in the course by providing their name, institution, and email.
-
In this process, a basic account is created for the user. This is necessary for the following functions to work:
-
1. Canceling the booking
2. Automated participation certificate
3. Reminder email 24 hours before the course starts -
⚙ whocanbook
4
Until when can you book?
-
An enrollment is possible until the course begins. The “book” button will be displayed up to 1 hour after the set course start. After that, it will be hidden.
-
This 1-hour grace period has been set in case someone decides to participate at short notice.
-
To enforce a registration deadline yourself, you can activate the “Full Protection” under “Protect Box” in the box settings, then no further registrations will be possible.
-
For the map owner, a Finish button will appear instead of an enrollment button after the course time ends, allowing them to end the course.
-
⚙ deadline
5
View Participant List
-
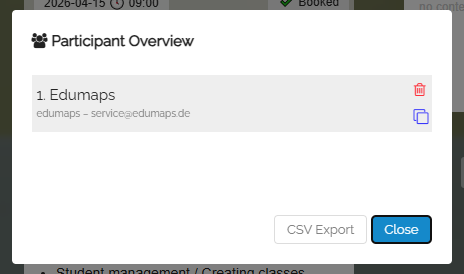
As a course instructor (map owner), you can view all participants for a course by switching to Edit Mode and then clicking on the button with the counter:
-
All other editors (as long as they are not anonymous) can also access the participant list in edit mode.
-
The list of participants then looks like this, for example:
-
⚙ viewparticipants
6
Remove Participants from Course
-
You can remove participants from the course at any time by opening the list of all participants and then clicking on the remove icon for the respective user:
-
⚙ remove
7
Participant cancels Course
-
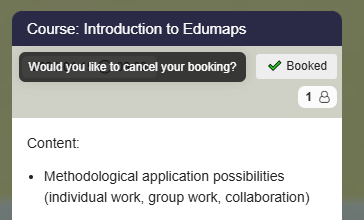
Each participant can deregister from the course by simply clicking on the “Booked” button:
-
⚙ cancel
8
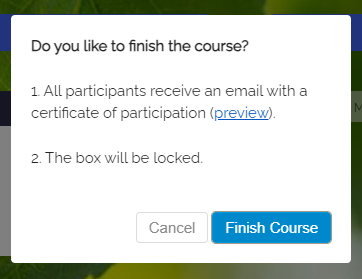
Finish Course
-
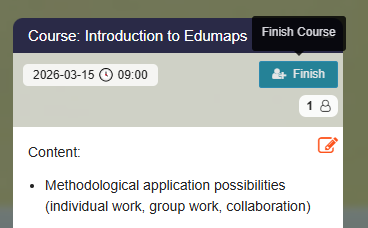
If the time of your course is in the past (at least 1 hour old), in edit mode a “Finish” button will appear instead of a “Book” button.
-
This is only displayed to the course instructor (map owner).
-
If you click on the “Finish” button, the following dialog appears:
-
There you can also view a preview of the certificate of participation.
-
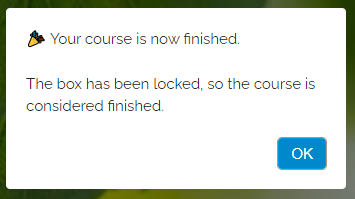
If you confirm by clicking on “Finish Course”, the following appears:
-
An email with a link to the certificate of participation will be automatically sent to all participants.
-
⚙ finishcourse
9
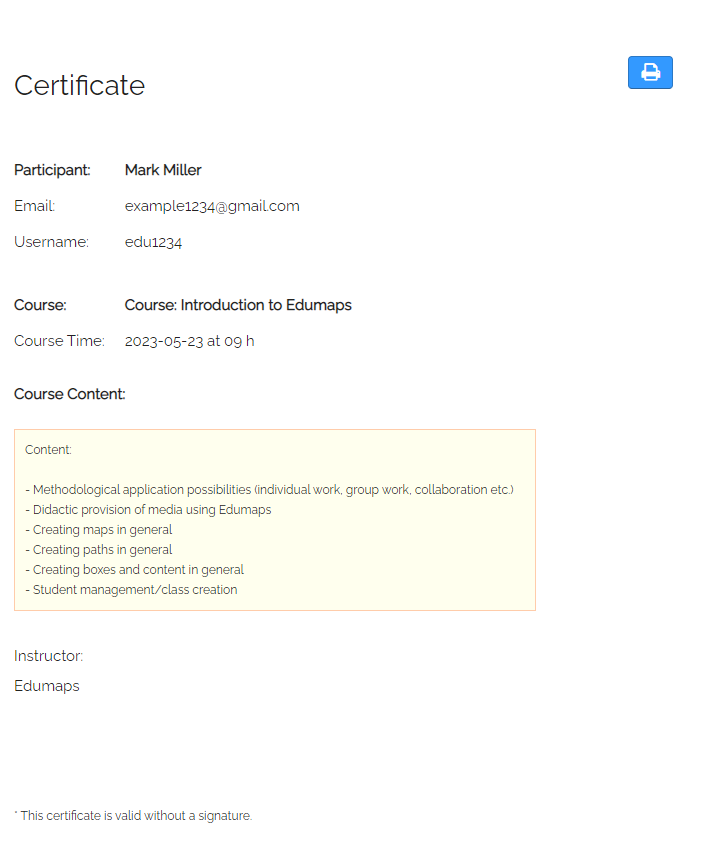
Certificate of Participation
-
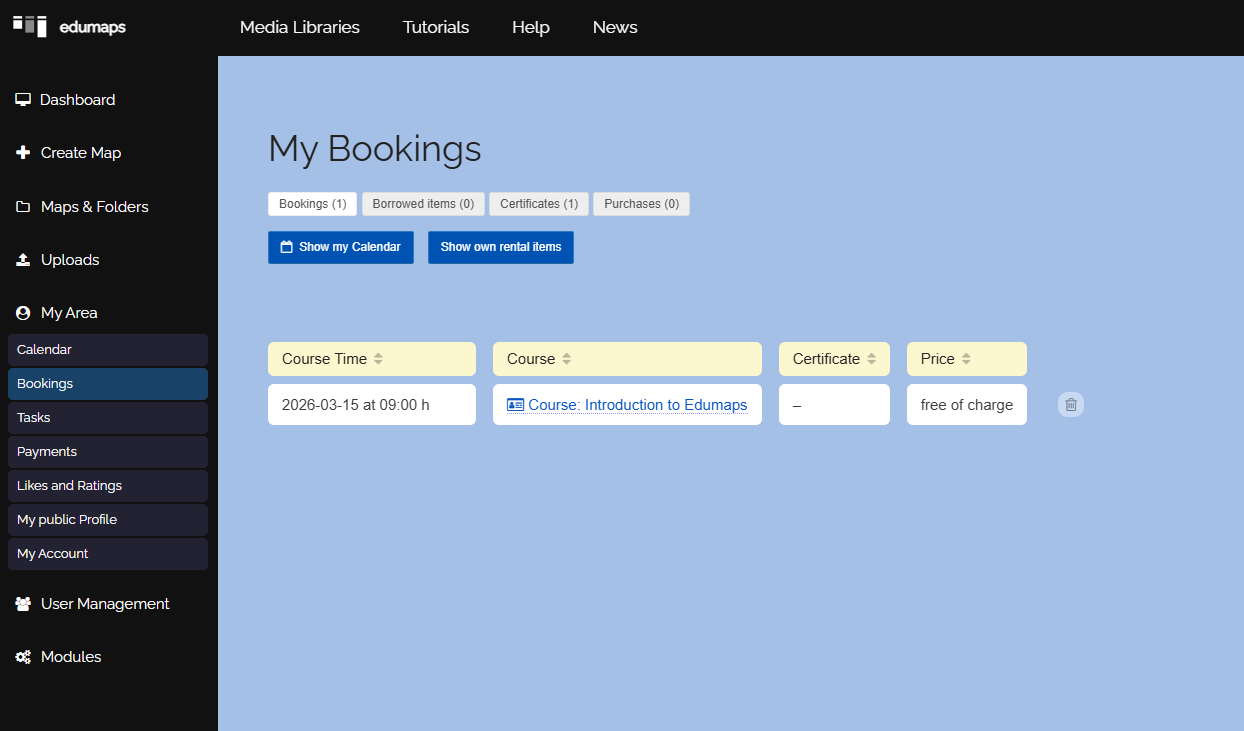
When a course is finished, each participant automatically receives an email with the certificate of participation.
- Each participant can also find the certificate of participation under "My Bookings".
-
In the last column, the user can view and print the certificate of participation.
-
⚙ certificate
10
Short Description for Certificate of Participation
-
If you want to insert only a brief description instead of the full description into the certificate of participation, you can do it as follows:
-
- Edit your box content (course content).
- Go to the end, insert a blank line and then three hyphens
---on another line. - This creates a horizontal line. It serves as a separator from the detailed description above to your new short description.
- Save the box.
- Now, only the text below the horizontal line will appear on the certificate of participation.
Description for box on map
---
Brief description for certificate-
⚙ description
11
Custom Letterhead with Logo for Certificate of Participation
-
Each certificate of participation can be customized by you. You can insert a logo as on a letterhead, enter your address and contact details, and add further data in the footer.
- To do this, simply open the page for editing the letterhead.
-
Make sure that the image for the logo is in JPG or PNG format.
-
⚙ letterhead
12
Automatic Emails
-
A participant automatically receives the following emails:
-
- Reminder email 24 hours before the appointment
- Course-finished email at the end of the course by the course instructor
-
The final email contains a link with which the participant can print out a certificate of participation. This includes his name and all the descriptions from the box.
-
⚙ emails
13
Export Participant List
-
You can export the entire participant list by clicking on the “CSV Export” button.
-
You can open the downloaded file in your spreadsheet program.
-
⚙ export
14
Export Participant List of all courses on a map
-
You can export the participants of all courses in a map as a single CSV file.
-
- Enter edit mode.
- Click on the three dots in the map menu and select "Export map".
- In the dialog that opens, choose "Participants of all bookings (csv)".
-
You can now save and reuse the generated CSV file on your computer.
-
The export includes the course name, email, full name, and username of each participant.
-
⚙ exportall

15
Overview: “My Bookings”
- On the “My Bookings” page, every user can see which courses he has already booked.
-
There you can also open the booked courses again.
16
Pay via Paypal
-
⚠️ The Paypal integration is not available on all servers.
-
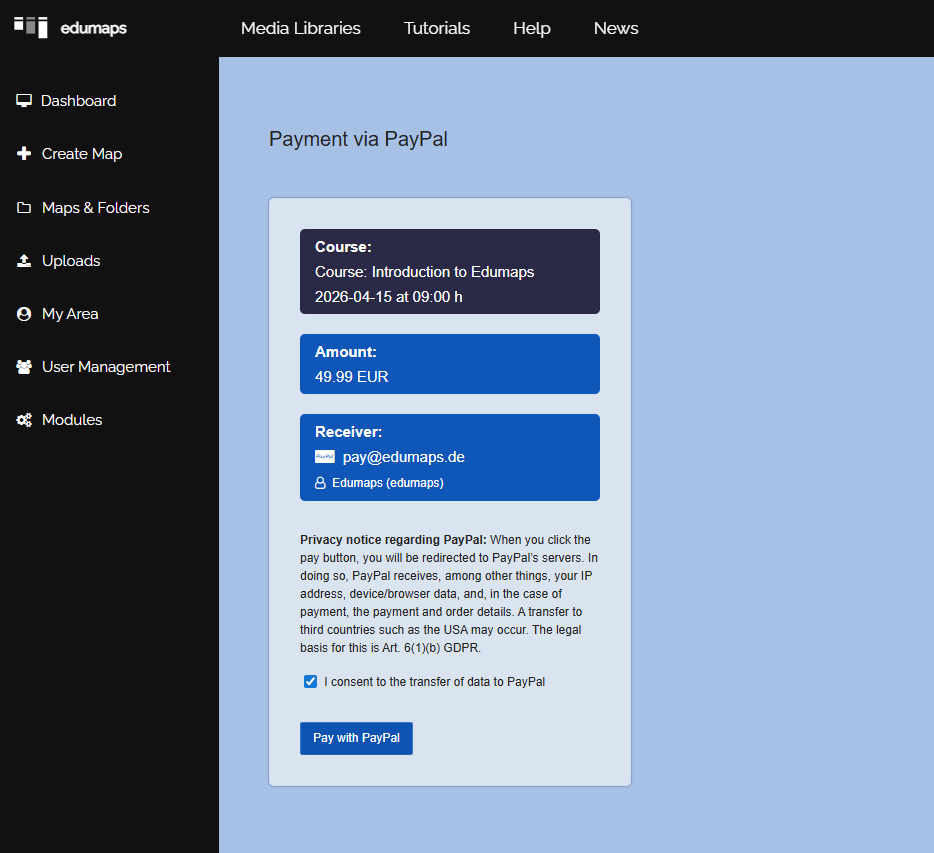
You have the option to set a price for your course and receive payment directly from your participants via Paypal.
-
To do this, go to the box settings and enter the “Payment amount via Paypal” in euros in the booking system.
-
After that, you will see a price label on the box.
-
Participants can now first book the course and then make the payment in a second step.
-
The dialog during booking appears as follows:
-
The user is then redirected to Paypal.
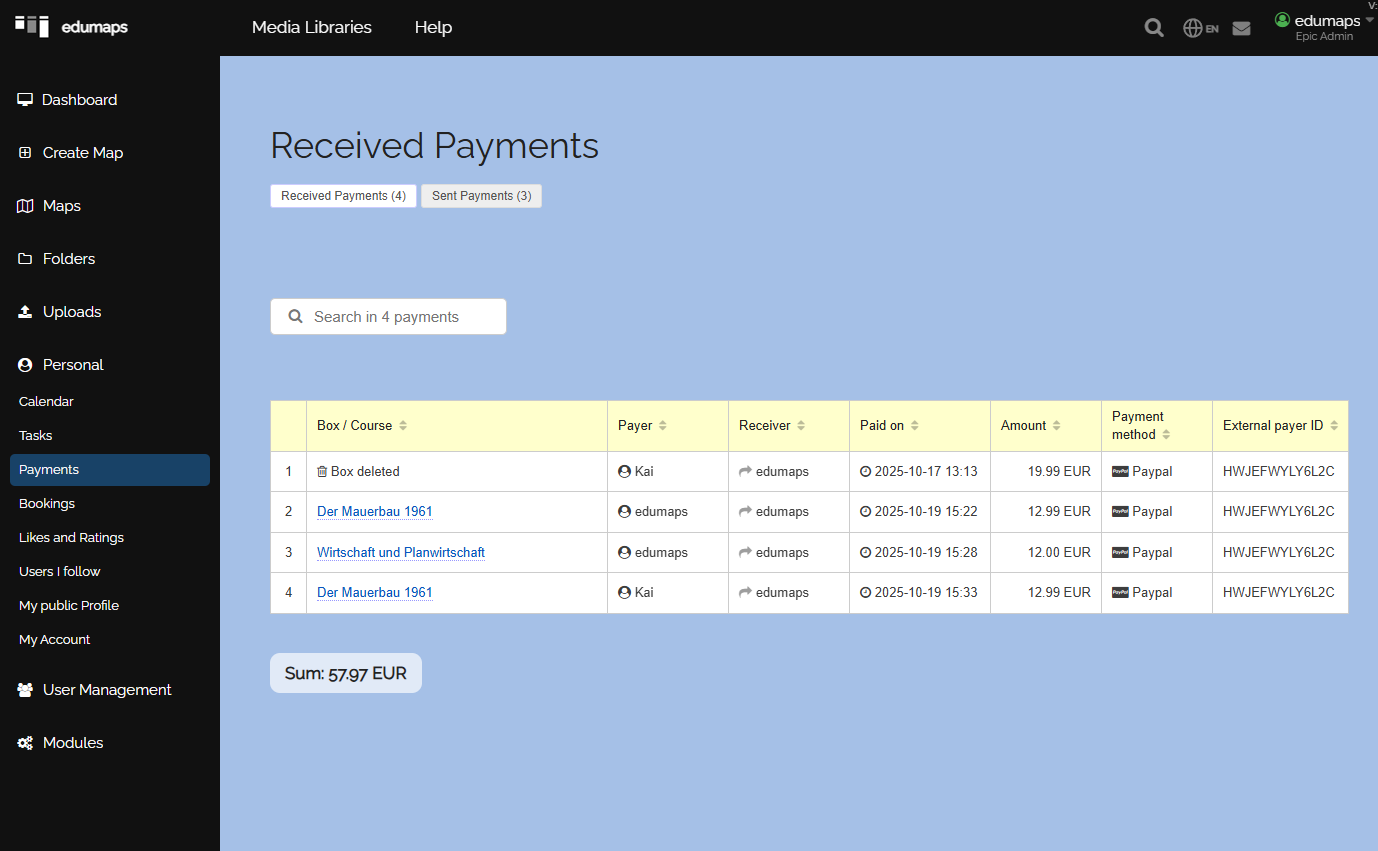
- After successful payment, the payment entry with all details appears for you as the course instructor on the page “Received Payments”.
-
-
You can set your PayPal address on the My Account page. If no email is set, the email of your user account will be used.
-
⚙ payments
17
Pay via PayPal to other users
-
If there are different course providers and the PayPal payments should go to different users, proceed as follows:
-
- The other users create maps with boxes, activate the booking module, and set a price for the respective box.
- The other users send you the link to the box or to the map.
- You embed the corresponding boxes of the other users on your own map.
- Now the different boxes from the different users can be booked and paid directly on your map.
- The respective payment goes to the corresponding course provider.
-
⚙ thirdpayments
18
Cancel course (by provider)
-
You can cancel the course as an owner by simply deactivating the “Booking system” option and saving the box. Alternatively, you can simply delete the box.
-
-
Question: Are all participants of a course automatically informed by email if I cancel the course?
-
An automatic email is not sent by Edumaps, as this would lead to mass emails and our mail server would be blacklisted. The function could also be misused to generate mass emails. Instead, proceed as follows: Open the list of all participants. To do this, click on the participant counter on the box. This list will show you all email addresses. You can now copy the emails and send a message to all participants using your email program.
-
Tip: If all courses in your map are canceled, you can export a CSV list of participants from all courses. You can find this CSV export under "Export map". You can then open the CSV file and copy the column with the emails.
-
⚙ cancel-provider
19
FAQ
-
In our FAQ, you will find answers to various questions:
-
- Can we setup the booking module so that only users who are already registered can book the course?
- ill people who have not registered an account also receive a certificate of participation by email?
- When a user books a course via email, he is automatically logged in, other times he is not. What is the reason?
- As a course instructor, how can I add multiple students to a course later?
- Why is the “Book” button still visible when the course time is in the past?
- Can I set up recurring bookings?
- Can you hide the date and time in the booking module?
- Can all participants in all boxes of a map be reset at once?
- How can a completed course be activated again (box is marked with “Finished”)?
- Why is the booking option not displayed?
- How can I see an example or preview of a certificate of participation?
- We have activated bookings for a box. Who can view the participant list of the course?
- Is it possible to set limitations for rental systems and calendar bookings (booking only during specific periods or with 2-hour slots)?
- Why do I not see the finish button for the bookings of the box?
-
⚙ faq