8.5 Guide for Superadmins: Managing Users
EdumapsIntroduction for Superadmins
-
⚠️ This role comes with special responsibility.
-
✔️ As a Superadmin at Edumaps, you have comprehensive administrative rights for all connected schools.
-
✔️ Among other things, you can:
-
- Edit all your schools
- Search and edit all users within your area of responsibility
- Reset passwords
- Access media management
- Share maps with all schools
1
Edit Schools
- As a Superadmin, you can manage all registered schools in the system on the page List of all schools.
-
Typical tasks:
-
- Adjust school data (name, email, school number)
- Change password
- Define school type
- Set maximum number of teachers
- Block school
-
Changes take effect immediately for the respective organization.
-
⚙ schools
2
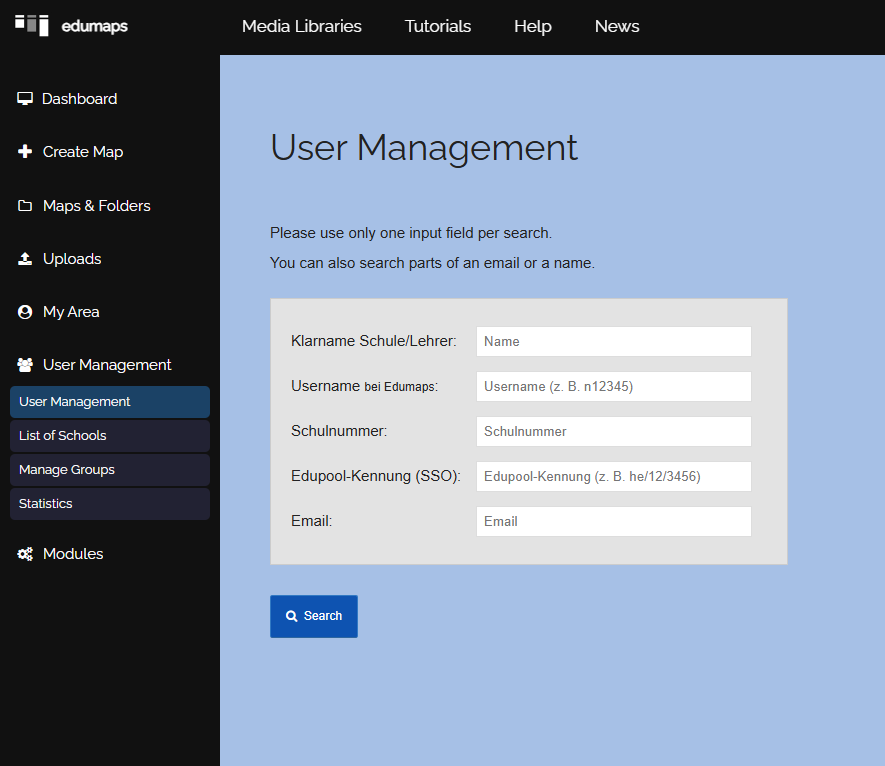
Search and Edit All Users
- With the User Management, you have access to all user accounts across all schools.
-
Options:
-
- Find users using the search function
- Edit profile data
- Change email addresses
- Reset passwords
- Review accounts across schools
- Configure storage space
- Assign accounts to other schools
- Adjust roles (T/S)
-
This function is especially helpful for support requests or school transfers.
-
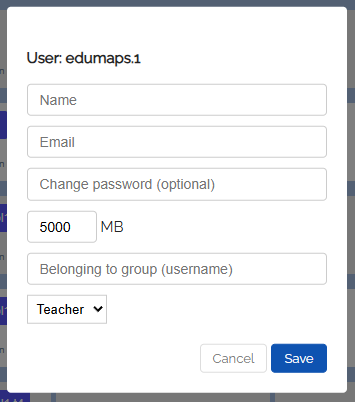
Once you have found a user, you can click the edit icon and modify the user data.
-
⚙ user
3
Change Passwords for Schools and Users
-
If there are login issues, you can manually reset passwords.
-
Procedure:
-
- Search user
- Open edit
- Set new password
-
Then inform the user about the new login credentials.
-
⚙ password
4
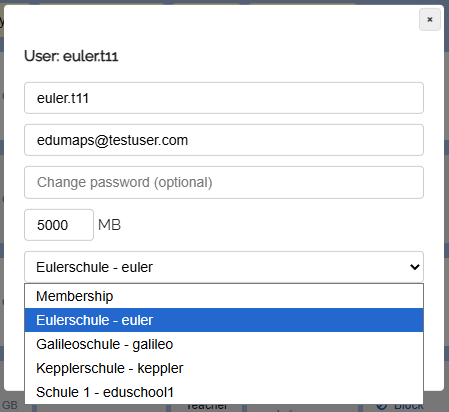
Change teacher and student affiliation
-
You can edit teacher and student accounts and move them to another school. This may be necessary if a teacher changes schools.
- Open the User Management, find the user, and click “Edit”.
-
In the dialog that opens, you will see a dropdown menu to change the affiliation.
-
⚙ affiliation
6
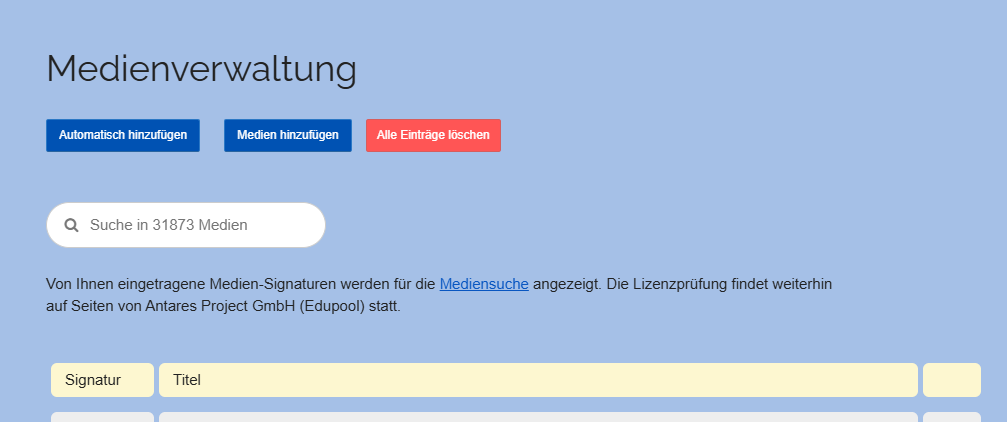
Access to Media Management
- As a Superadmin, you have access to the central media management.
-
There you can:
-
- View your licensed media
- Review content
- Remove media if necessary
-
⚙ media
7
Share Maps with All Schools
-
You can publish selected maps so that they are available to all schools in the system.
-
This is particularly suitable for:
-
- Announcements
- State-wide materials
- Central templates
- Reviewed teaching content
-
After sharing, schools can access these maps and integrate them into their work.
-
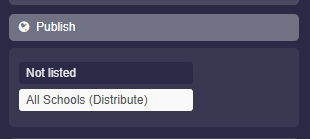
Activate sharing:
-
To share a map, go to the map settings and select “Publish”, then activate “All Schools (Distribution List)”.
-

-
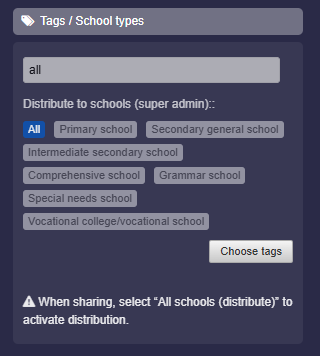
Sharing by school type:
-
You can also specify whether the map should be distributed to all or only certain school types. To do this, click “Tags / School Types” in the map settings. Select “All” (or “Primary School”, etc.) and save the map.
- Schools will then find the map on the page “Media Center” (under Maps & Folders).
-
⚙ publish
8
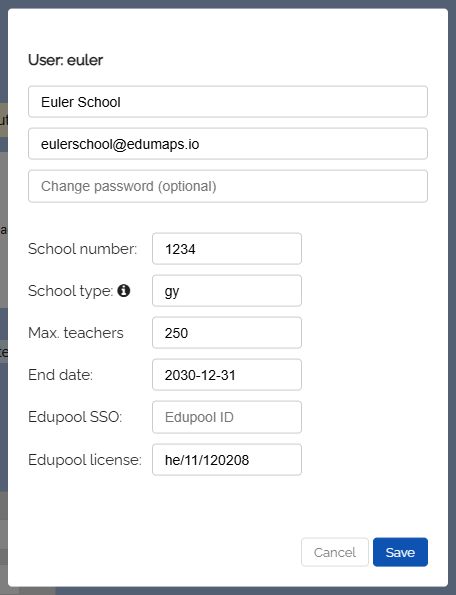
Enter or Edit Edupool Credentials for Schools
-
When editing a school as a Superadmin, you can enter or modify the Edupool ID for single sign-on. Important: Each Edupool ID must be unique and may only be assigned once per school.
- Additionally, there is an input field for the Edupool license ID for the licensed media library. An Edupool ID may be assigned to multiple schools.
-
If you do not enter an Edupool license ID, the license stored in your Superadmin account will apply.
-

-
⚙ edupool
10
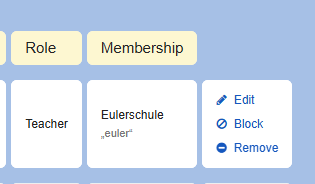
Remove User from School
-
As Superadmin you can remove teacher and student accounts from the school/organization.
-
Click on “Remove” and confirm.
-
If you remove a student or teacher from the school, the account will be downgraded to a basic account. This means the user will no longer have access to the “My School” or “Media Center” pages. In addition, they will no longer be able to access licensed media.
-
⚙ remove
11
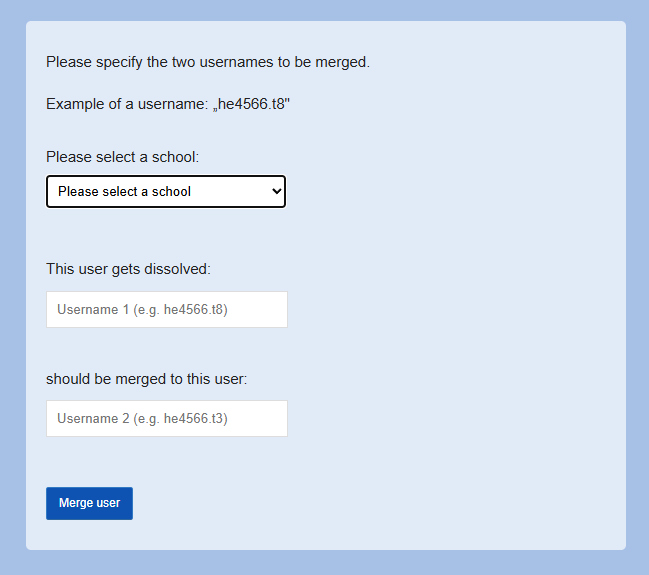
Merge User Accounts
- On the page User Management you will find the button “Merge accounts” below.
-
Here you can merge two accounts with each other, meaning, combine the data.
-
Both accounts must be associated with your school.
-
-
Please note that a merging of accounts cannot be undone.
-
⚙ merge
12
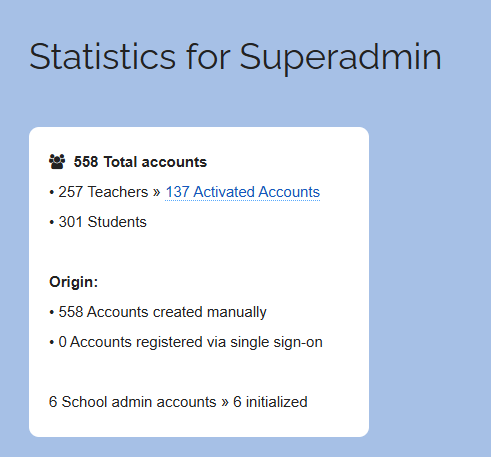
Statistics for Superadmin
- As a Superadmin, you have access to the page “Statistics for Superadmin”.
-
Further down, part of this data is displayed over time in a chart.
- Click the link “… activated accounts” to go to the page “Activated Accounts”, which shows how many users have already activated their account.
-
⚙ statistics