

8.9 Guide for Admins: Connect Microsoft 365 to Edumaps
Edumaps Tutorial EdumapsIntroduction
-
✔️ Teachers sign in to Edumaps with their school's Microsoft 365 account, without a separate Edumaps password. If the school wishes, students can do the same.
-
✔️ The school is connected once. Teachers send a join request, which the school admin accepts.
-
✔️ If students should sign in too, enter the sign-in domains. Students then get their account at their first sign-in.
-
✔️ Edumaps receives only the name, sign-in address and user ID of the account.
📑 Table of contents
-
- Requirements
- Overview: who does what?
- School admin: connect the school to Microsoft 365
- Microsoft administrator: approve Edumaps
- School admin: enter the sign-in domains
- Optional: restrict the sign-in in Microsoft Entra
- Teacher: request access
- School admin: accept requests
- School admin: merge with an existing account
- Teacher: sign in with Microsoft
- Student: sign in with Microsoft
- Notes
1
Requirements
-
For the setup you need:
-
- a running school license with free seats for teachers
- the school admin account of your school on Edumaps
- an administrator of your Microsoft 365 tenant (Microsoft Entra ID)
-
If students should sign in with Microsoft too, you also need:
-
- free seats for student accounts in your school license
- the domains that teachers and students use to sign in to Microsoft 365 (for example school.ch and stud.school.ch)
-
Sign-in with Microsoft 365 is available on the servers www.edumaps.de and www.edumaps.ch.
-
The school admin continues to sign in with username and password.
2
Overview: who does what?
-
Several roles are involved in the setup. At many schools one person takes on several of them.
-
Role Task School admin Connects the school to Microsoft 365, enters the sign-in domains if needed and accepts the teachers' requests Microsoft administrator Approves the app “Edumaps” once for the school Teacher Signs in with Microsoft and requests access Student Signs in with Microsoft and gets an account right away, if the school has entered a domain for students -
The sequence:
-
- The school admin and the Microsoft administrator connect the school to Microsoft 365 (once).
- Optional: The school admin enters the sign-in domains. This is required for the sign-in of students.
- The teacher signs in with Microsoft and sends a request. The school admin accepts it.
- Students sign in with Microsoft and get their account at their first sign-in.
- From then on everyone signs in with Microsoft.
3
School admin: connect the school to Microsoft 365
-
The school admin carries out this step once. Ideally the school's Microsoft administrator is present, because the Microsoft sign-in is done with his account.
-
- Sign in to Edumaps with the school admin account (username and password).
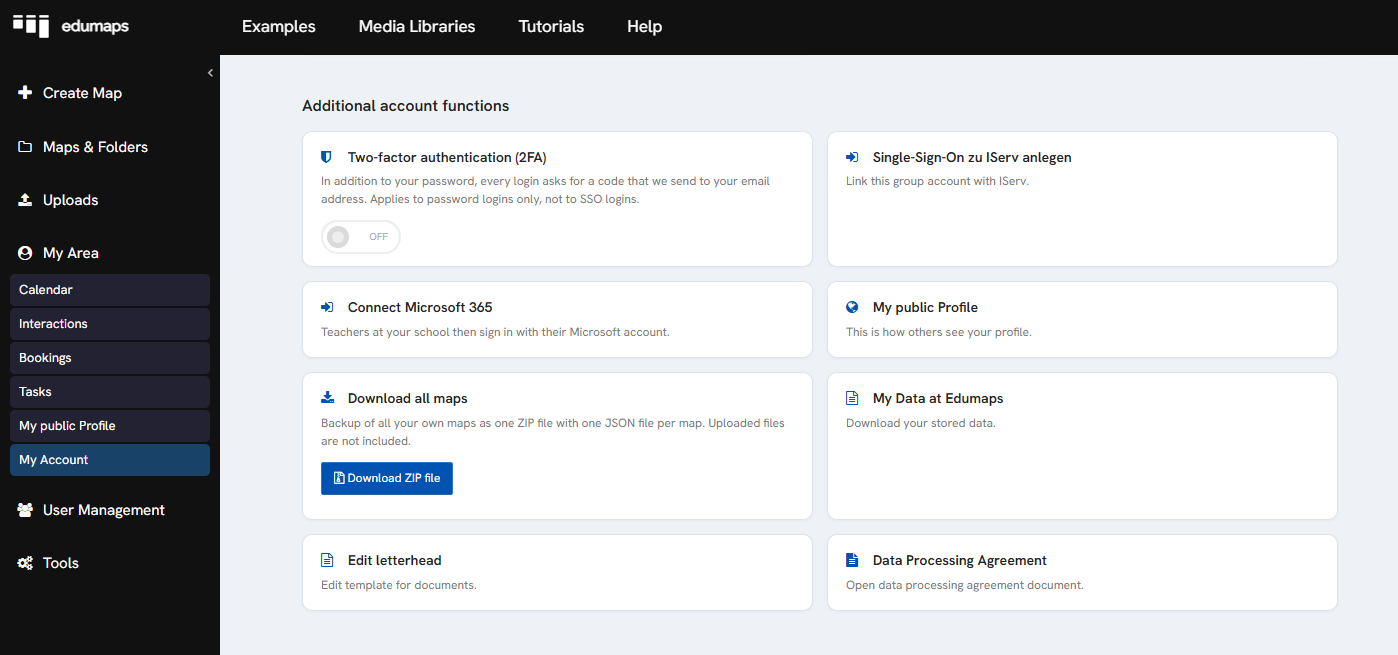
- Open “My account” and click the card “Connect Microsoft 365”.
- Click “Connect with the school's Microsoft account”.
- On the Microsoft page, sign in with the account of your school's Microsoft administrator.
- Confirm the approval of the app “Edumaps” (see the next step).
- You return to Edumaps and see the message “Microsoft 365 is now connected to your school.”
-
The Microsoft sign-in in this step only proves that the Microsoft tenant belongs to your school. Edumaps stores nothing but the tenant ID. No Edumaps account is created for the Microsoft account used here.
-
A Microsoft tenant can be connected to exactly one school on Edumaps.
4
Microsoft administrator: approve Edumaps
-
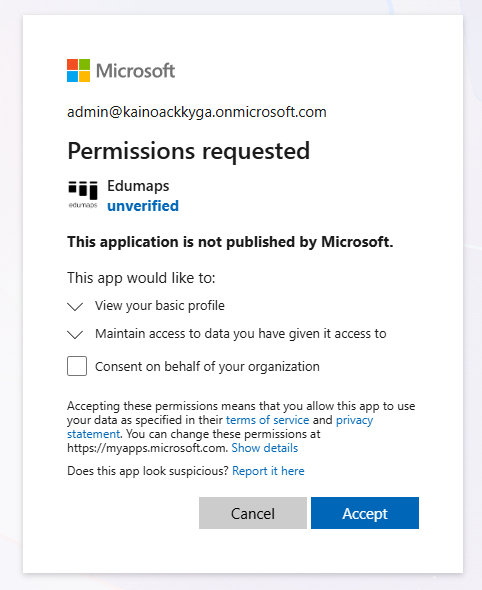
At the first sign-in, Microsoft shows a page with the permissions the app “Edumaps” requests.
-
- Sign in with an administrator account of your Microsoft tenant.
- Tick the box “Consent on behalf of your organization”.
- Click “Accept”.
-
Edumaps is now approved for the accounts of your school. Teachers and students are not asked for permissions when they sign in.
-
Which data does Edumaps receive?
-
- Name
- Email address and sign-in name of the Microsoft account
- User ID of the Microsoft account
-
Edumaps does not access emails, files, calendars or any other Microsoft data.
-
Microsoft marks the publisher of the app as “unverified”. The sign-in works regardless.
-
If a notice appears instead of the permissions page, saying that approval by an administrator is required, an account without administrator rights was used. Repeat the connection with the Microsoft administrator's account.
-
The approval can also be granted later: in the Microsoft Entra admin center under “Enterprise applications”, in the app “Edumaps”, in the section “Permissions”.
5
School admin: enter the sign-in domains
-
This step is optional. The sign-in domains define who counts as a teacher and who as a student. It is required for the sign-in of students.
-
What counts is the domain of the Microsoft sign-in name, that is the part after the @ of the address a person uses to sign in to Microsoft 365. It can differ from the email address.
-
Your entry Result Both fields empty Every sign-in counts as a teacher's request. Students do not get an account. Teacher domain only Teachers send a request. All other accounts are refused. Teacher domain and student domain Teachers send a request. Students get their account at their first sign-in. All other accounts are refused. -
- As the school admin, open the page “Connect Microsoft 365”.
- In the section “Sign-in domains”, enter the teachers' domain, for example school.ch.
- If students should sign in too, enter the students' domain, for example stud.school.ch.
- Click “Save domains”.
-
Separate several domains with a comma. A domain can only be in one of the two fields.
-
Do not enter only the students' domain. Teachers could then not sign in with Microsoft.
-
Enter the domains before you announce the sign-in at your school.
6
Optional: restrict the sign-in in Microsoft Entra
-
With sign-in domains entered, Edumaps only admits accounts of these domains. An additional restriction in Microsoft Entra is then usually not needed.
-
It is useful if you enter no sign-in domains or want to admit only part of the accounts. The Microsoft administrator then specifies which accounts can use the sign-in to Edumaps.
-
- Open the Microsoft Entra admin center and select “Enterprise applications”.
- Open the app “Edumaps”.
- Under “Properties”, set the option “Assignment required?” to “Yes” and save.
- Under “Users and groups”, add the accounts you want, individually or as a group.
-
Assigning whole groups requires the Microsoft license Microsoft Entra ID P1 or P2. Individual accounts can be assigned without this license.
-
If students should sign in too, assign teachers and students to the app.
-
Without sign-in domains and without this restriction, students can send a request as a teacher too. This does not make them members of the school, because the school admin has to accept every request.
7
Teacher: request access
-
Each teacher requests access once, on their own.
-
- Open the login page of your Edumaps server and click “Sign in with Microsoft”.
- Sign in with your school's Microsoft account.
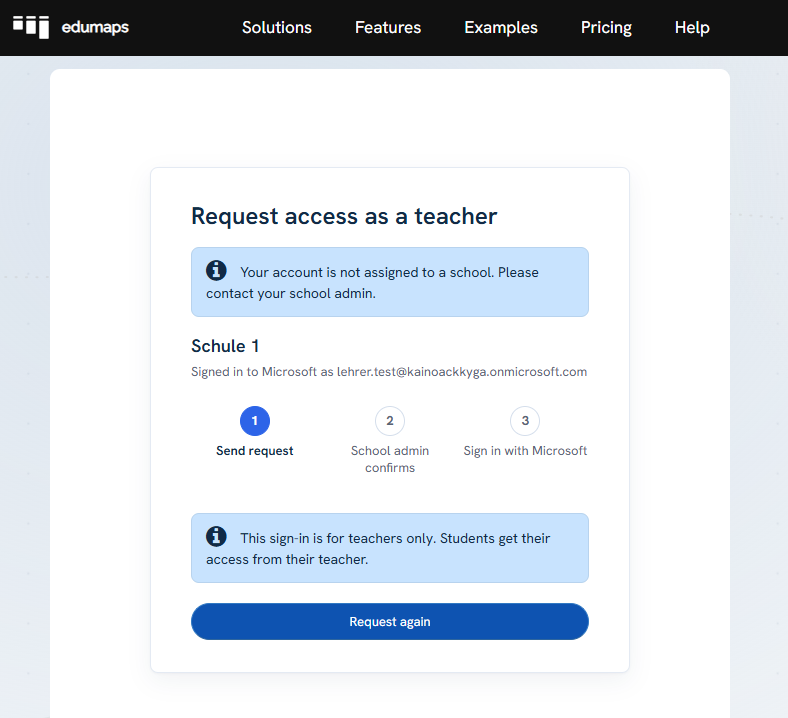
- The page “Request access as a teacher” shows your school and your Microsoft account. Click “Request access”.
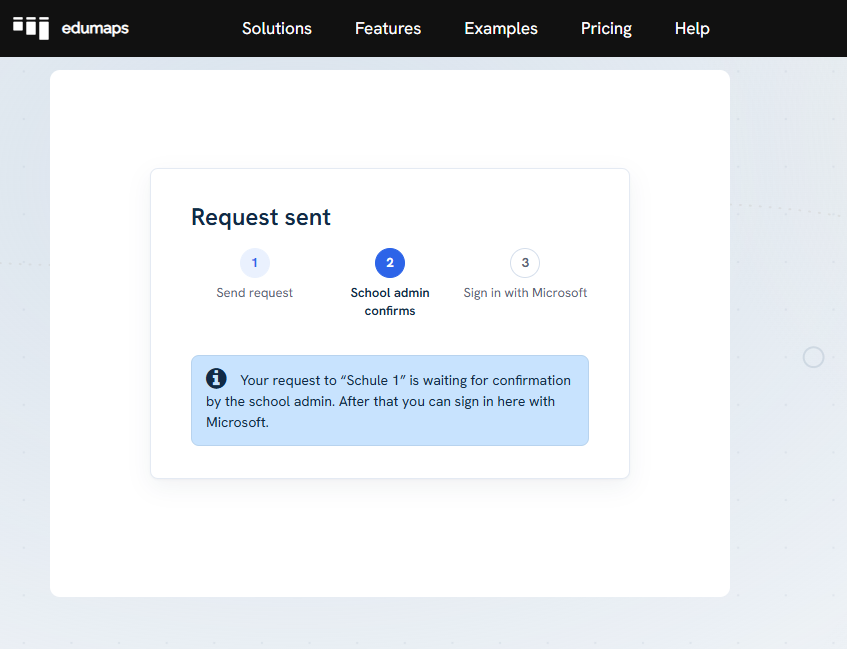
- The page “Request sent” appears. Your school admin now receives your request.
-
Do you already have a teacher account at your school? Send the request anyway. Your school admin merges both accounts and your maps are kept.
-
If your request was rejected, you can send a new one through “Request again” once within 24 hours.
-
If your school's join mode is set to “immediately” and a domain for teachers is entered, teachers become members directly, without a request.
8
School admin: accept requests
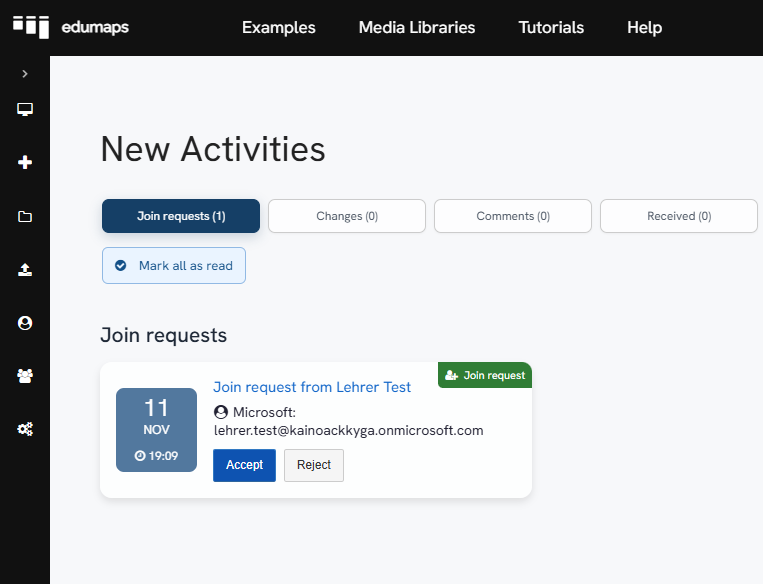
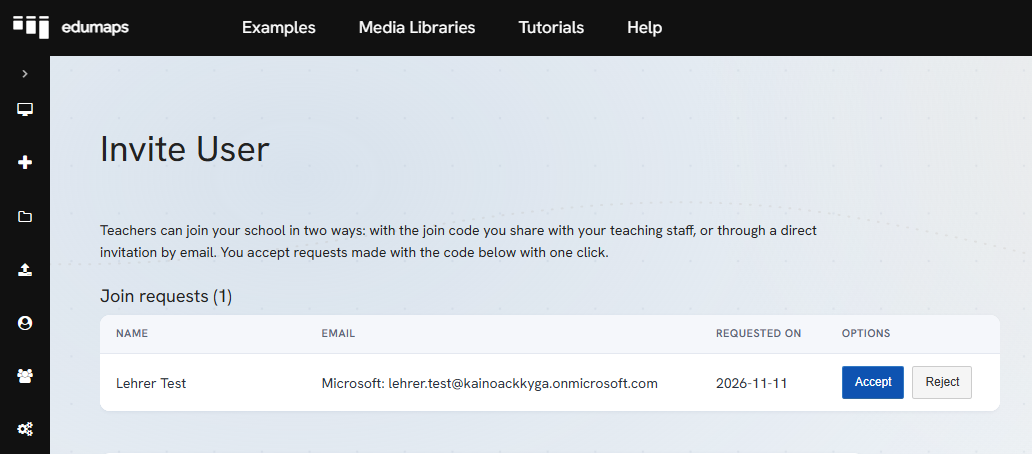
- Every request appears in your notifications and in the list of join requests.
-
- Check the line “Microsoft: …” with the email address of the Microsoft account. It tells you whether the request comes from a teacher of your school.
- Click “Accept”.
-
The teacher is now a member of your school and is listed as a teacher in the user management.
-
With a domain for students entered, students do not appear in this list. Without sign-in domains, reject requests from students or unknown accounts.
-
Only as many requests can be open as your school license has free seats for teachers.
9
School admin: merge with an existing account
-
If a teacher already has an account at your school (for example created by CSV import), the Microsoft sign-in first creates a second account. Edumaps recognizes this by the identical email address and offers to merge the two.
-
- Accept the request.
- The confirmation shows a note about the existing account. Click the button for merging there.
- The merge page is already filled in. Check both accounts and confirm.
-
After that:
-
- The existing account is kept, with all its maps.
- The sign-in with Microsoft now belongs to this account.
-
Edumaps never merges accounts automatically. The school admin makes the decision.
10
Teacher: sign in with Microsoft
-
Once the school admin has confirmed the request, the setup is complete.
-
- Open the login page of your Edumaps server.
- Click “Sign in with Microsoft”.
-
You are signed in directly as a teacher of your school. You do not need a separate Edumaps password.
-
If you still see the page “Request sent”, your school admin has not accepted the request yet.
11
Student: sign in with Microsoft
-
Students do not need a request. The requirement is that the school admin has entered the students' domain.
-
- Open the login page of your Edumaps server.
- Click “Sign in with Microsoft”.
- Sign in with your school's Microsoft account.
-
Edumaps creates the student account at the first sign-in. The student is signed in directly and is listed as a student in the school's user management.
-
New students have no class yet. A teacher or the school admin adds them to a class so that they receive distributed maps.
-
If all seats for student accounts are taken, a notice appears and no account is created.
12
Notes
-
- One sign-in method per school: We recommend that all teachers and students of your school use only the sign-in with Microsoft. More on this: One server and one sign-in method per school
- School not connected: If someone signs in with Microsoft before the school is connected, a notice appears. No account is created.
- Students: Without a domain for students entered, students cannot sign in with Microsoft. You then manage student accounts in Edumaps as before.
- Role: Whether an account is a teacher or a student is decided at the first sign-in. If you change the sign-in domains later, this only applies to new accounts.
- Removed students: A student you removed from the school is not added again automatically at the next sign-in.
- School admin: The school admin account cannot sign in with Microsoft. It always uses username and password.