6.2 Task Module
Edumaps Tutorial EdumapsIntroduction
-
✔️ With the Task Module, you can assign any box to a user.
-
✔️ You will find an overview of all assigned tasks in a separate table, easy and quick to sort. This way, you can track every status and improve collaboration.
-
✔️ Whether you are leaving a small note or managing a large project – with this feature you manage tasks more efficiently.
1
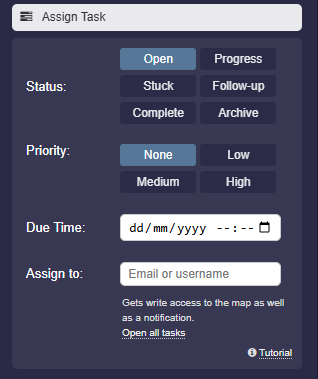
Manage Status
-
When assigning a task, you can set the status to clearly document progress.
-
The following statuses are available:
-
- Open: The task has been created, but not yet started.
- In Progress: Someone is actively working on the task.
- Stuck: There are obstacles or delays. The task is not progressing on time.
- Follow-up: The assigned user has a follow-up question.
- Complete: The task is complete and ready for review.
- Archive: The task is archived and is no longer shown as an active task on the “My Tasks” page.
-
The status can be changed at any time, so all participants are always up to date.
-
⚙ status
2
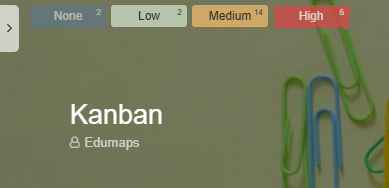
Set Priority
-
Prioritize tasks to highlight the most important ones.
-
You can choose from the following options:
-
- None: No special priority assigned.
- Low: The task is less urgent.
- Medium: Normal priority, moderate importance.
- High: This task takes precedence and requires prompt attention.
-
This helps prevent misunderstandings and ensures everyone is focused on the right priorities together.
-
As soon as priorities have been assigned, a task filter appears at the top left of your mapp, allowing you to filter the corresponding boxes.
-
⚙ priority
4
Assign to User
-
A task can be assigned to a specific user. Enter the username of the recipient.
-
If no user is entered, the task is assigned to yourself.
-
The assigned user automatically receives write access to the respective pinboard. They can document collaborations, edit tasks, or update the status.
- Additionally, the user receives a notification about the shared task.
-
⚙ assign
5
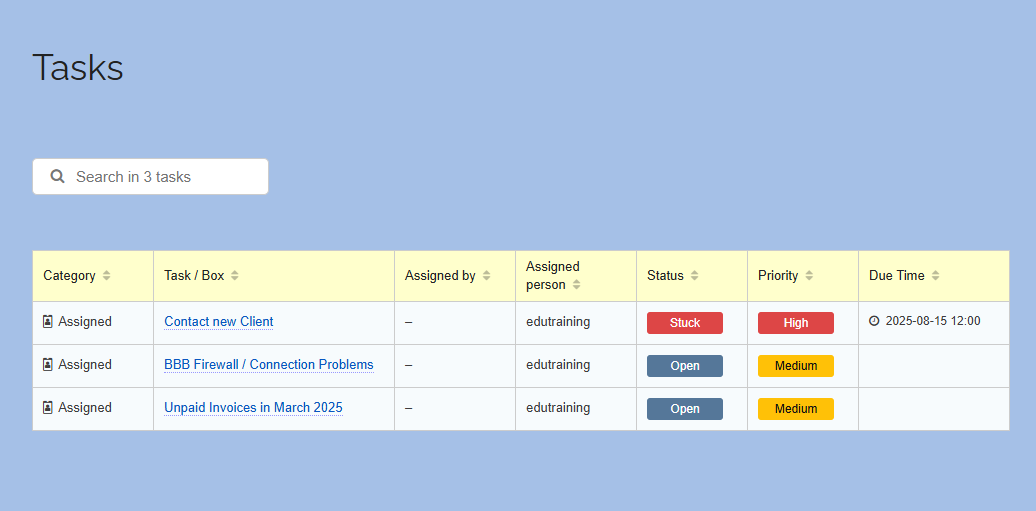
Overview of All Tasks
- On the “Tasks” page, you will find a central overview of all your tasks.
-
This page offers the following features:
-
- Display all received, assigned, and own tasks in a table
- Ability to sort tasks by different criteria (e.g., title, due date, status, priority)
- Quick access to the respective box/map
-
Category Description Received Tasks Tasks assigned to you Assigned Tasks Tasks you assigned to others Own Tasks Tasks you created and are working on yourself -
This way, you always have a full overview and can easily search or filter for specific tasks.
-
⚙ overview
6
Step-by-Step: Assign a Task
-
1. Open the pinboard where you want to create a task. Switch to edit mode.
-
2. Select the box you wish to assign a task to. Click the three dots and choose “Edit”.
-
3. In the box settings, select the menu item “Assign Task”.
-

-
4. Fill out the fields as needed:
- Status (e.g., Open, In Progress)
- Priority (None, Low, Medium, High)
- Due date (if desired)
- Recipient username (optional) -
5. Save the box. – The recipient gets a notification and can start working on the task.
- 6. Afterwards, conveniently track all changes via the central Tasks page.
-
With just a few clicks, tasks are clearly assigned, prioritized, and traceable.
-
⚙ activate
7
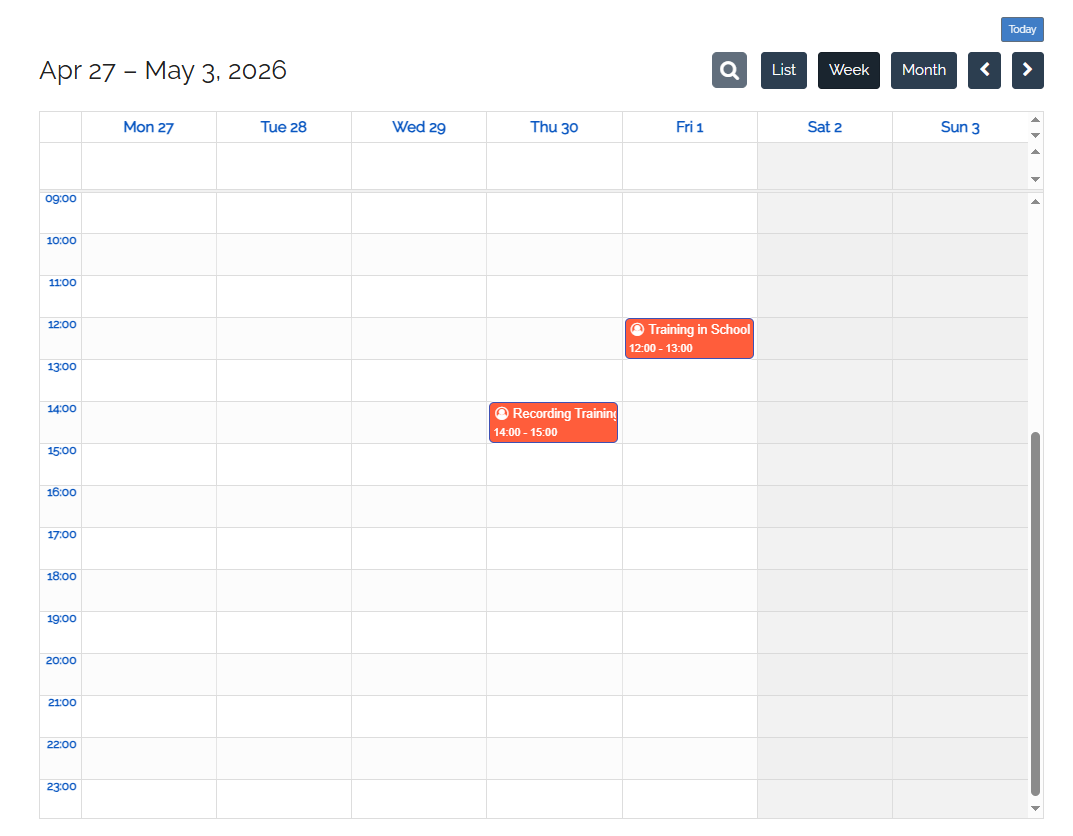
Tasks in User Calendar
-
Every task that you assign to a user with a due date will appear in their user calendar and can be opened from there.
-
Your own tasks with due dates will also be shown in the calendar.
-
Tip: At the bottom right, you will find the “iCalendar Link”. You can add this directly to the calendar you currently use (such as Google or Apple Calendar). This way, all your due dates will appear directly in your personal calendar.
-
⚙ calendar
8
Archive Tasks
-
If a task has been assigned to another user, this user should set the status to “Done” after completion. This will create a notification for the map owner.
-
Then, the assigner should check the result (box content).
-
If there are still problems, the assigner can set the status back to “In Progress” and leave notes in the box content.
-
If the task is completed, the assigner can set the status to “Archive”. As a result, the task will no longer appear in the task list of the user.
In addition, the task (if a due date has been set) will no longer appear in the user's calendar. -
⚙ archive