2.3 Sharing Maps - Special Cases
Edumaps Tutorial EdumapsIntroduction
-
✔️ At Edumaps, you can share a map quickly and easily via the blue share button.
-
✔️ However, you can also distribute specifically to selected groups and users. This sharing can also be revoked.
-
✔️ Content can also be partially shared with individual column groups.
-
✔️ You can also, as a teacher, make your maps available to your entire school with just one click.
1
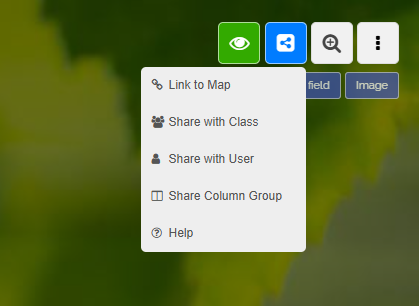
Map Sharing Dropdown
-
You can access the options for Map Sharing by clicking on the blue Share icon.
- See Tutorial: Sharing Maps with Access Rights
-
⚙ dropdown
1
Share by Map Link: Teachers can edit and students can read
-
- You want to share your map for editing with teachers.
- You want to share your map for reading with your students.
- Anonymous users should have no access.
-
-
Setting:
-
- Open the map-sharing dialog.
- Click on "Edit map" and select "Access for registered users only".
- Copy the link and distribute it to your colleagues.
- Open the map-sharing dialog again.
- Click on "Read map" and do not check "Access for registered users only".
- Copy the link and distribute it to your students.
-
⚙ teacherstudent
2
Share only a single column
-
- You only want to share one column of your map for reading or editing.
- Other users should still be able to see the entire map.
-
-
Setting:
-
- Click on the three dots next to the column.
- Select “Link to column”.
- Choose “Read” or “Edit”.
- Activate “Hide other columns” in the dialog.
- Copy the link and send it to the users who should only see the column.
-
⚙ columnsingle
3
Share only a single Box
-
- You want to grant access to only one box in your map for reading or editing.
- Other users should still be able to see the entire map.
-
-
Setting:
-
- Click on the three dots next to the box.
- Select “Link to the box”.
- Choose “Read” or “Edit”.
- Activate “Hide other boxes” in the dialog.
- Copy the link and send it to the users who should only see the box.
-
⚙ boxsingle
4
Protect individual columns from editing
-
- You want to allow editing of your map. However, certain columns should be protected so they cannot be edited.
-
-
Setting:
-
- Click on the three dots by the column and select “Edit”.
- In the column editor, activate “Protect column”. A lock icon will appear on the column.
- Open the map-sharing dialog and send the link with editing rights.
-
Alternatively, you can use the Share with column groups.
-
⚙ protectcolumn
5
Protect individual boxes from editing
-
- You want to make your map available for editing. However, certain boxes should be protected so that they cannot be edited.
-
-
Setting:
-
- Click on the three dots on the box and select “Edit”.
- In the box editor, enable “Protect box”. A lock icon will appear on the box.
- Open the map sharing dialog and send the link with editing rights.
-
⚙ protectbox
6
Special case - Group 1 edits, Group 2 reads
-
Special Case - Edit Group 1, Read Group 2
-
- Group 1 should be able to edit.
- Group 2 should only be able to read.
- The map should be distributed to both groups with **“Share to Group”, so that the users can find the map on the page “Received”.
-
-
Setting:
-
- Click on the blue Share Map button and select “Share to Class”.
- In the dropdown, select Group 1.
- Set access to “Edit Map” and confirm.
- Click on the blue Share Map button again and select “Share to Class”.
- In the dropdown, select Group 2.
- Set access to “Read Map” and confirm.
-
⚙ groups
7
Release: “My School (Read)”
-
- You want to share your map for reading with all teachers and students of your school.
- Users who do not belong to your school should not have access.
- The map appears on the page “Maps of My School”.
-
-
Setting:
-
- Open the map settings.
- Under “Release”, select “My School (Read)” from the dropdown and click on “Save Map”.
-
⚙ myschool